How to Build Your Own Pergola

Pergolas are a beautiful addition to any back garden, offering shelter and shade in the summer months as well as an attractive frame for vines and climbing plants. Hiring a professional is the simplest way to make this addition to your home, but building your own can save you hundreds of pounds and offers a relatively simple and rewarding DIY project for experienced enthusiasts. Ideally, you should have at least one other person to work with when building and installing your pergola so that you can complete the project safely.
Plan the Space
The first step is deciding where you want the pergola to go – if the area isn’t already paved or decked it’s best to do that part before you start the pergola project so that you have a sound foundation. Your space will define the size, shape, and the style of your pergola so it’s important that you get this part right before you start measuring up. Moving one is harder than it seems!
Your pergola should be built away from major tree roots and buried underground utilities.
Find Your Perfect Design
Once you’ve decided where the pergola should go, it’s time to choose a design and start planning. Here are just a few considerations you should look at before making a decision:
- Do you want a slatted roof or a completely covered one?
- Do you want climbing plants on the pergola? If so, will you want to put planters at the base?
- Will it be a wall-leaning pergola?
Sketch or Use a Plan
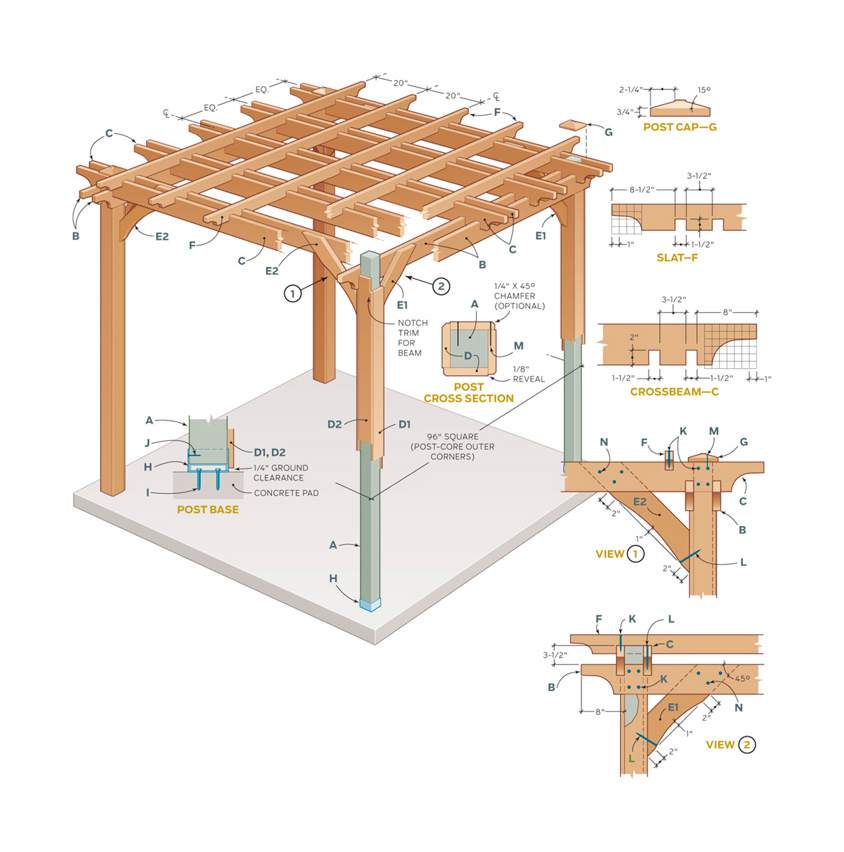
If you’re buying timber rather than using a kit, it’s important to figure out your plan before you buy anything to ensure you have everything that you need. This is one of the most comprehensive plans we’ve seen online (from Popular Mechanics).
Your location will determine whether you dig holes for the posts or secure your posts using base anchors. Base anchors will take less time to add but your terrain and position should be the deciding factors rather than time spent on the project.
Buy Materials
Your sketch/plan will offer information on the sizing and details for your materials. We recommend using treated carcassing timber because it ages well and resists decay. You can apply a stain/sealer to suit your home and other garden buildings.
Install Your Posts
Depending on your area, this will either involve digging post holes or installing base anchors. If you are digging holes, make sure that you have called the local utility companies to find out whether there are any underground services you may disturb. Mark your post locations with stakes and verify that the positions are accurate by measuring diagonally from corner to corner on both sides – the measurements should be identical. You can dig the holes with a Fencers Grafting Tool, Power Auger, or a Post Hole Digger, and the depth of the holes should be around a quarter of the height of the post. Once you have placed the posts in their respective holes, temporarily shore it up with stakes set at 45 degrees to the ground so that the posts stay still while the concrete sets.
If you are using post-base anchors, lay out the positions and measure them diagonally to ensure that they’re accurate. You can bore holes with a hammer drill before using screws or expanding bolts to fix the bases in place. Once you have the base anchors secured in place, hold each post plumb and drive nails through the anchors.
Add the Crossbeams and Rafters
Once your post concrete has set or the bases are properly anchored, you can assemble the crossbeams. Sandwich each corner post between two 47 x 200mm timbers (or whatever your plan requires) and set it at your preferred height (remember that your rafters will add height to your pergola once they’re installed). You may need a centre splice if your crossbeams aren’t long enough. It’s best to add an inner and outer beam for stability.
Measure and mark your positions with a circular saw and use a level to make sure the posts are at the same height. Secure each beam to the top outside face of the post with two 100mm (4 inch) screws to temporarily hold them in place – once all of them are in position secure the beams with your bolts. Then you can add your rafters, whether they’re at 300mm (one-foot) intervals or grouped together in two’s or three’s.
Once everything is perfectly in position, permanently secure the beams and posts using 200mm (8 inch) galvanized bolts.
If you would like decorative ends on your rafters it’s important that you cut this before you install them.
Finish Up
If you would like to add climbing plants to your pergola, you can run twine around the sides and wave vines around the twine until they’re mature enough to grow up to the rafters.
Once that’s done, all you need to do is pour yourself a drink and enjoy your new space.
See Our Range Of Garden Buildings Online
