There are a number of reasons you would want to replace bricks around the home including crumbling, breaking apart and surface damage or stains. Broken bricks lead to a number of issues due to water and moisture entering the home which causes the formation and buildup of mound, foundation movements and more.
Thankfully, removing and replacing bricks is not as stressful and complicated as you would think. Here’s a step-by-step guide to complete a brick replacing job.
Finding your replacement bricks
The first step is finding the bricks that resemble what’s been used on your house. If your house is a fairly recent build it should be straightforward to find its replacement - if it’s much olde, it can become difficult and that’s where we can help!
We have a Brick Center where you can browse hundreds of bricks and our salesman have vast knowledge of brick type and their availability. With these two options, we will be able to find your brick!
Removing a damaged or old brick
Preparing your new bricks
So…you’ve found your replacement bricks and are ready to begin - success! To begin replacing your bricks, you’ve first got to submerge your new brick in water. This is so that when you’re ready to insert it into the brickwork it can easily stick in place without the bricks around you taking all the moisture from the mortar/cement.
Removing old cement to pull out the old brick
The cement around your bricks, also known as mortar, should be removed to make way for fresh cement. Start by getting out a drill that can withstand going through brick and cement, usually a high-powered 800W drill.
The most efficient way is to drill holes into the mortar, ensuring they’re close together to save you hacking away at it later on. Once you’ve drilled holes all across the brick, use a hammer and chisel to chip away at the mortar.
As you’ve chipped away at the brick, eventually it’ll become loose and you’ll be able to wiggle the brick out of its place. If you’re looking to reuse this brick then you’ll need to remove the excess mortar ready to be used again.
Laying new cement for the replacement brick
You’ll have already submerged your bricks in water to ensure they’re full of moisture before you place them into the brickwork. Ensure the holes in the middle of the brick have also been soaked in water so that they don’t get too dry when the mortar is added.
With your mortar mix ready, lay a semi-thick layer of cement on the bottom part of where the brick will be placed. Then start working your way around the edges so that there’s a layer of cement all around where the brick will be placed.
Don’t be shy with the amount you add in but use the mortar around the other bricks as a guide as to how much you should be adding in the gaps. Tidy up the cement placement with a trowel so that it’s all flat and clean.
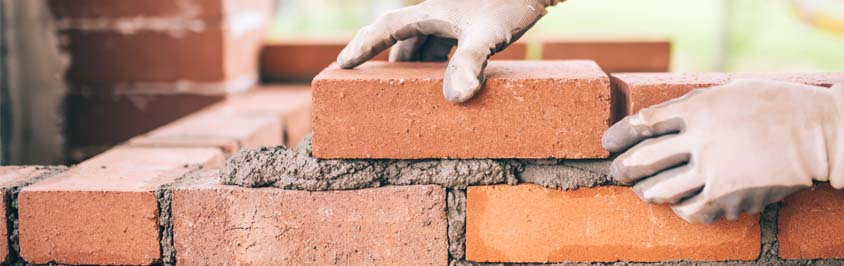
Adding your new brick
It’s now a case of sliding the brick into the space you’ve made! Make a double check that it’s moisturised enough before inserting and then add it into the gap you’ve made surrounding the cement.
Some of the cement will ooze out - again, use a trowel to make everything smooth and match up with the other bricks.
Congratulations! You’ve replaced and removed your first brick! With regular practice you too can keep your bricks maintained and fresh all year round.
We have everything you would need to carry out the guide above! Below is a list of products that are essential…
Soft Sand Mini Bag https://www.lawsons.co.uk/product/soft-sand-bulk-bag/a20020006
Soft Sand Bulk Bag https://www.lawsons.co.uk/product/soft-building-sand-mini-bag/a20040005
Sand& Cement Mix https://www.lawsons.co.uk/product/6kg-jetcem-sand-and-cement/s00001478
Pointing Trowel https://www.lawsons.co.uk/product/faithfull-pointing-trowel-150mm-%286-%29-soft-grip-handle/s00005275
Plasticiser https://www.lawsons.co.uk/product/5ltr-febmix-plus-mortar-plasticiser/s00001461