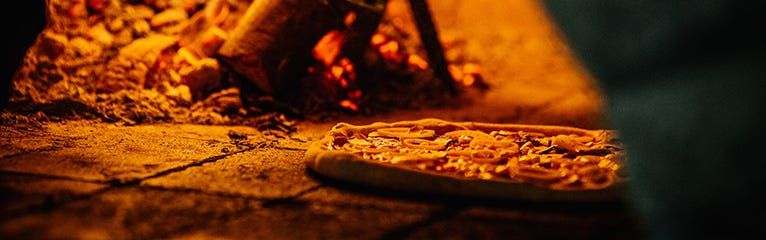
There’s nothing better than homemade pizza, especially in a real wood-burning oven. It’s actually a lot easier to make than you think, so take a look at the instructions below so you can enjoy authentic, homemade pizza all through this summer.
You will need:
- Sand(around 10 bags)
- Cement(around 3 bags)
- Bricks(around 100)
- A large diameter pipe, pot, or bucket (for the chimney)
- Chipboard (2 pieces that are at least 40x48 inches)
- Plastic sheeting
- Wood or foam to shape the arch
- Wood to mould a concrete base
- Aggregate
The tools you will need are:
- Hammer and chisel
- Trowel
- Spade
- Drill
- Wood saw
- Wood screws
The first part is choosing a good location – you want it to be away from the house and any overhanging trees. You also need to consider that pizza ovens are heavy so you should avoid putting it on a deck if you have not reinforced that area.
- Create the base: once you have decided where you would like the pizza oven to be and measured the area, you need to create a base. Use your chipboard and wood to create a mould for the concrete, nailing the wood securely and ensuring that there are no large gaps since this will create a seal to hold in the concrete. Mix your concrete in a 1:2:4 ratio (cement/sand/aggregate) and use a spade to fill the mould. Use some scrap wood to level off the concrete and ensure that it’s flat so that your pizza oven is resting on a level base.
- Create the shape: once your base has dried, you can start creating the shape of your pizza oven. Use the bricks to build the walls and get an idea of your roof – it’s a good idea to stack the bricks roughly before you secure them to make sure that you have enough bricks and you have the shape you’d like. You may even want to split the bricks into halves to give you more flexibility and a rounder shape.
- Create your arch: the arch is where you put your wood and pizza in, so it needs to be comfortably large. The walls are easy enough to create by stacking bricks, but use some foam, wood, and/or spare bricks to support the arch itself while you’re stacking and building. A curved archway allows your bricks to support each other using their own weight rather than relying entirely on cement to counteract gravity.
- Cement your bricks in place: once you’re happy with your size and layout, it’s time to build it to last! Mix your cement and start on the first layer of bricks – it’s a good idea to also do the arch at this point as well. Once that is done, lay a plastic sheet on the inside space and fill it with sand. This should be filled with each additional layer so that you have something supporting the roof bricks while the cement is wet – otherwise you risk a collapse. The plastic sheet will stop the sand from sticking to the inside of your oven. Don’t forget to leave a space for your chimney – this should be higher than the arch so that the smoke travels out of this, rather than where you’re standing and watching your pizza cook.
- Add a concrete layer: once your bricks have all been cemented, it’s time to cover your entire pizza oven in cement. Cover your entire pizza oven liberally in a cement/sand mix to give it more insulation.
- Remove the supports and sand: give your pizza oven a few days to dry before you start removing the supports. Take out the archway supports first and then rip the side of your plastic sheeting to dig the sand out. Remember to remove the plastic sheet as well once you’re done.
- Light a fire inside your pizza oven: just a small fire should slowly dry the inside of the oven. Once you’re happy that there are no cracks forming, you can slowly build it up and make your first pizza!